


Your beer fermenting bucket and the brewing process
September 23, 2013 at 11:28 AM
Hello and welcome to the second instalment of H&O Plastics’ Buckets of Beautiful Homebrew.
As we discussed in last month’s edition, brewing your own beer is simple, fun and very rewarding. All you need is the right equipment, a little space, and a beer fermenting bucket full of enthusiasm.
In part one we learnt what equipment you need and the ingredients that go in to making your tasty brew, as well as a basic overview of brewing and bottling. In this edition, we are going to take a closer look at the ins and outs of the brewing process.
Step 1 – Brewing
Brew day is the most exciting and important part of the homebrew process. That heady sweet-sour aroma of bubbling hops really gets the taste buds working over time.
First things first, you need a stainless steel pot large enough to hold 10litres of water and 2.7kgs of malt extract. Give the pot a good scrub, pour in the water and start heating. Once the water starts to get warm, start slowly pouring in your malt extract, mixing it thoroughly. If you are using fresh malt extract, you will notice it has a sticky, syrupy consistency. You may need to swirl a little warm water around inside the can to get all of the extract out. In the brewing trade, this mixture is called ‘wort’.
As you add the malt extract, it’s essential that you keep stirring. If the malt is left to settle at the bottom of the pot it will harden and caramelise. This will have an effect on both the colour and the flavour of your beer so you want to try and avoid it.
Once you have mixed in all of your malt extract, you need to slowly bring it to the boil. You will notice that when your wort first starts to boil it will produce a lot of foam. Keep an eye on your pot, as there is a tendency for foam spillage. This can be avoided by spraying cold water on the foam using a plastic spray bottle.
It may be a little tedious, but the best way to avoid a boil-over is to carefully manage the heat over the first fifteen minutes of boil time. If the foam threatens to spill over the edges of the pot, simple adjust the heat accordingly. And never use a lid when boiling your wort. It may come to the boil quicker, but as soon as your remove the lid it will boil over, creating a huge foamy mess.
When the foam has died down and you have a nice steady boil going, you are ready to add the hops. Simply weigh out the desired amount (around 2.25ozs is ideal for this amount of liquid) and add them to the pot.
Keep the mixture boiling for another 60mins (approx.), stirring occasionally to avoid caramelising. The amount of boil time will affect the flavour of your beer. The longer you boil it, the bitterer it becomes, and so you may want to take it off the heat earlier. A boil of at least 30mins is recommended.
With the boiling over, it’s time to start stage two: cooling and fermentation.
 Step 2 – Cooling and Fermentation
After you have removed your pot from the heat, you need the wort to cool. To avoid infection, you need it to reach room temperature as quickly as possible, and there are several ways of achieving this. The easiest is to add the remaining cold water to bring your batch up to 20 litres. You can also stand your pot in a bath of cold water. More experienced brewers often use a length of copper tubing called an immersion coil, running cold water through it to quickly cool the beer.
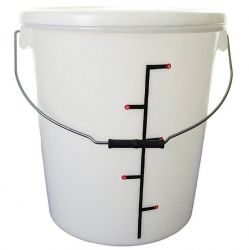
It’s now time to transfer the wort to your fermenting bucket. But before you do this, it’s vital to ensure that your fermenter, siphon tubes, airlock and any other equipment you are using are thoroughly sanitized. This will prevent any infection at this vulnerable stage of the process. Use a food grade home brew bucket from us and you can use specialist brewers cleaning products, but diluted household bleach does just as good a job. If you use bleach, make sure everything is carefully rinsed afterwards.
After you have siphoned your wort in to your plastic fermenter bucket, it’s time to add the yeast or ‘pitch’. If the liquid is too hot, it will kill the yeast, which is why it is so crucial that it’s no hotter than 72F. Following the instructions on the packet (the process varies between liquid and dry yeast), stir in your yeast, and then place the top on your fermenter, fit the airlock, and put your beer in a cool, dark place with a steady temperature.
Within 12-36 hours, your airlock will start bubbling. This will continue for about a week while the beer continues to ferment. These bubbles are CO2 released by the fermentation process. By the time your beer is ready to bottle, the bubbles should’ve slowed to one very couple of minutes. If you don’t see any bubbles, check the seal on your fermenter and your airlock. The beer will still be fermenting, but it’s best to have an airtight container.
So that’s it, the brewing is done and it’s time to let the yeast work its magic. It will be a good couple of weeks before your beer is ready to bottle. And that’s all you need to know about the brewing process.
Thanks again for reading, and please do join us next time for the third and final instalment where we will take an in depth look at the bottling and aging process. And remember, if you missed part one, it can be found further down the news section.
Add Pingback
RL Plastics Ltd | Britannia House | Dock Road | Birkenhead | CH41 1DF
T: 0151 639 0002 | F: 0151 639 0006 | E: [email protected]